Showing posts with label Repurposing. Show all posts

Wednesday, June 20, 2012

Diorama Party Part 3: "Home Made" Trophies and Voting Ballots

I meant to get this out last week.
But you know how that goes.
At least for me.
Anyway, this is my last post about the diorama party.
And this isn't really about the dioramas, but just a fun extra I tacked onto the party.

I wanted to give out awards to all the participants at the party.
I wanted there to be voting, I wanted there to different categories for voting, and I wanted awards that were tongue in cheek.
So I spray painted some trophies.
You could use these trophies for lots of other occasions where you want to give out awards that are a bit silly.
You could/should also use them for a kid party sometime.
They are a big hit with the kid crowd.
What kid doesn't love a trophy?
So here goes:
Homemade trophies and voting ballots--a how-to.

Making the Trophies
The trophies themselves were very easy to make.
The hard part was finding the trophies in the first place.
I called some thrift stores first and they all made it sound like I was a bit crazy when I asked them if they had any old trophies.
"No," they said emphatically, "they did not!"
I thought I'd go with another award until James saw a bunch of these at this place.
I wasn't sure how I'd make just the trophy tops work, but at 25 cents apiece, I knew I had to try.
(I was wondering why just trophy tops, and my friend surmised it was because of the kid's names on the trophies.)
Step 1.
We picked out a random assortment of trophy tops, came home and laid them out for spray painting.


Step 2.
I primed the trophy tops.
I always, always prime with the gray, spray paint primer.
It makes the color coat go on so much better.


Step 3.
I added color.
Once the primer coat dried, I sprayed the trophy tops and with the assortment of colors that we had on hand.
The kids were taking these trophies very seriously and wanted them all to be gold.
But since I was going for the tongue in cheek look, I went with color.
Also, some did have writing on them and I wanted to cover that up.
Mostly though, they just looked way more awesome when they were sprayed up.


Step 4.
I made bases for the trophy tops.
I wasn't sure what to use for the bases.
Cutting wood blocks and then drilling holes into those blocks was way more work than I had time for.
Instead I bought some large pieces of Styrofoam in the florist section of Michal's.
I cut it in squares, and spray painted each square to match its trophy top.
Step 5.
I attached the trophy tops to the bases.
This part was easy.
You can do almost anything with hot glue.
Using the trophy tops themselves, I poked a hole into the top of each Styrofoam piece, filled the hole with hot glue, and then stuck the trophy top into the hole.
They stayed put and I had a nice little trophy base.


And despite the fact that they were meant to be tongue in cheek, I think the trophies turned out pretty nice.
On the party day, I displayed them with all the dignity due them.


Making the Voting Ballots
The voting ballots were even easier to assemble.
I used library pockets and library cards to make each ballot.
(These are the same library ballots I used to create my business cards for my blog.  They have come in very handy for other projects.  I just love the nostalgic feel of them.)
I purchased the library pockets and cards at a Lakeshore Learning Store, but you can get them online via Amazon if you don't have a Lakeshore store or other teacher supply store near you. 
(Lakeshore doesn't sell these online--only in their brick and mortar stores.  The Amazon links are provided above.)


On the outside of each ballot, I stamped the word, VOTE.
Inside each ballot was a library card with the 10 categories written on the card.
You can see all the categories here.
I hand wrote each card because I was only doing 10.
But if you had a lot to do, you could easily make 1 and photo copy it.


For the voting
When the dioramas were finished, each participant was given a ribbon with a number on it.
They put the ribbon next to their diorama and then all the dioramas were put on display together.
(I made the ribbons with brown painters paper, a circle hole punch, some colored paper taped to the circle, and my stamps to stamp a number on the circle.
They turned out cute and were easy to make.)


Then everyone looked at each diorama and placed it in the category they thought fit it best.
For example, Aaron's trailer was given the #2 ribbon.
So everyone looked at their ballots and put a #2 next to the category they thought best fit Aaron's trailer.
He ended up winning the Craftsmanship category.


All the guests were very nice and pretended to take the voting seriously.
They humored me, the voting ballots, the spray painted trophies and the award ceremony.
Except for the 8 year old guests.
They took the voting very seriously.
There was no pretending about it.
I appreciated everyone's response to this part of the party--those who humored me and those who took it seriously.
Either way, it was fun.
And that was what this was all about.


Were the participants stoked to get their trophies?
Heck yeah they were!


Should you make home made trophies, voting ballots and hand out awards at a crafting party?
For grown men or little kids?
Heck yeah you should!

Next up, Rhubarb Snacking Cake.
And then I have a list a mile long of other topics  want to write about.
It's summer--maybe I'll get to it!

Love from,
Greta

Wednesday, June 13, 2012

So You Want to Throw a Diorama Party? Here's How

How does one throw a  diorama party, you ask?
Turns out, a diorama party is actually one of the easier parties I have thrown.
Mostly what you need is a lot of "stuff".
We found a lot of our "stuff" at a this place. (post on it forthcoming.  it's too cool a place not to talk about at length.)
It's a place where you can find jars full of marbles, bottle caps or buttons at 5 cents a scoop.
Rolls of yarn, old record covers, and cardboard in every conceivable shape of size on available to you for pennies.
It's diorama paradise.
We walked out with a bag filled to the brim with "stuff" and I spent only $4.

On the day of the party, you'll want to lay out all your supplies.
I grouped things loosely, and wasn't too uptight about things being beautifully displayed.
(although I had to fight the urge. trust me.)
Because I knew that once artists start to create, keeping everything in pristine order can kill the creative vibe.
Here are some of the supplies we had out for building the dioramas.


Paint, brushes, small pieces of Styrofoam, string, rubber bands, markers, wood glue, tacky glue, rulers, hole punches. and staplers.
There were lots of options for sticking things together.
Besides the wood glue and tacky glue, there was duct tape, masking tape, washi tape, double stick tape and, of utmost importance, a glue gun.
But no elmer's glue.  It takes too long to dry.  Speed is important here.
Then there was a bunch of the "stuff" all jumbled together.
There were buttons, old Christmas ornaments, pictures, floral wire, Popsicle sticks, toothpicks, clothes pins, a few plastic figurines, corks, pipe cleaners, wooden skewers and wooden dowels of different sizes.
A lot of this stuff I found in the house or garage.
You'll be amazed at all the building supplies you have in your house once you start looking.


There was spray paint. 
Of course.
And lots and lots of cardboard.
We had piles of cardboard, colored paper and random printouts of cool things.
Like I said, the set up for a diorama party isn't particularly pretty.
(i'm sure martha could have made it pretty.  but i have neither the staff not the unlimited budget that martha has to make anything , so i had to be cool with piles of cardboard on the ground rather than in perfect, matching containers.)
Another must have for the party is a place to plug in the glue gun.
(having more than one glue gun and lots of extra glue sticks is helpful)
It's also good to have exacto knives and a cutting mat on hand for cutting out of intricate designs.
Tape measures, a power drill, small hand saws, pliers and a screwdriver or 2 are all handy tools to have out, depending on the level of building going on at your party.
(8 year olds might not be needing the power drill.  but you never know.)
Lastly, you'll need lots of room for everyone to spread out.
And then, you step back and watch the magic happen.
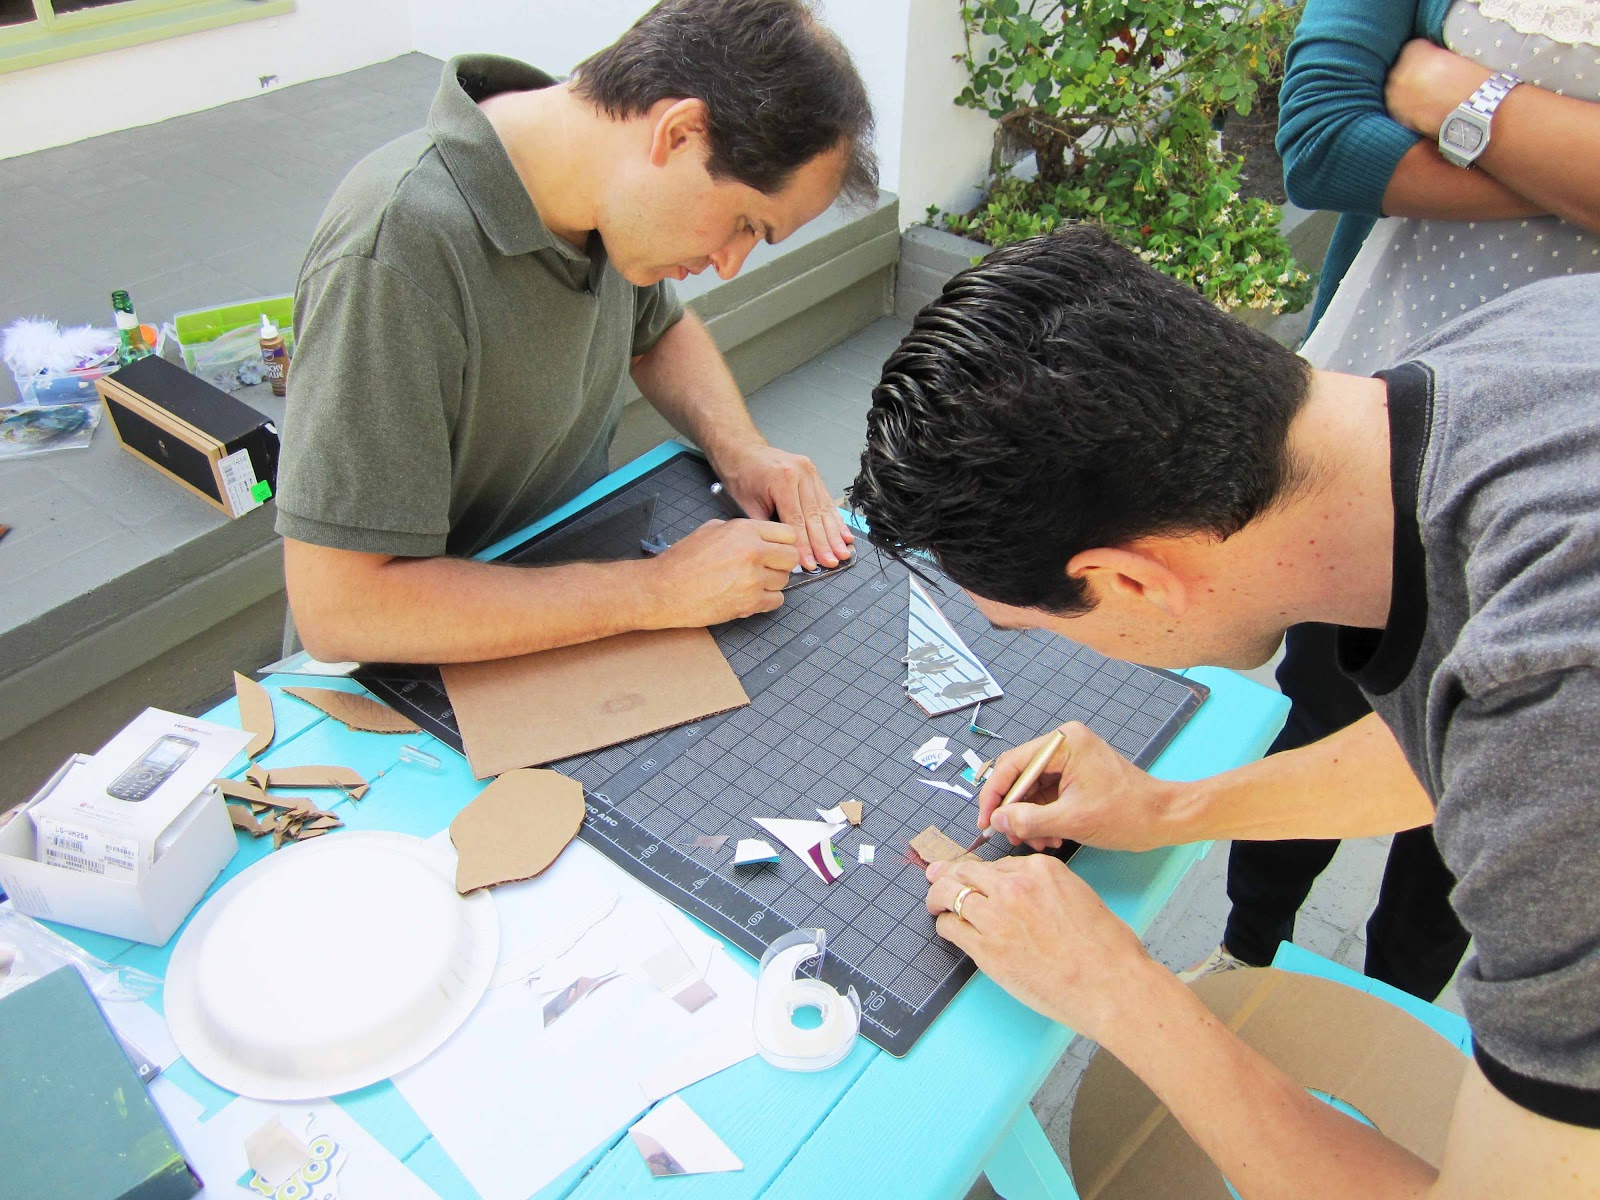
Check out these artists at work.


If you're hosting an adult diorama party, you'll want to have your younger guests not be too young.
Otherwise, you'll be spending all your time helping them and not creating your own diorama.
James was the perfect age: old enough to build without assistance and old enough to be engaged by everyone else's projects.

I highly recommend doing this party with younger kids, just know that they'll need more help.
But they will really have a lot of fun.
William and Lilly have been sitting in the driveway making their own dioramas since Sunday and having a blast.
Lilly is nearly 4 and very capable of executing her own ideas with just a bit of help.
Again, much of their enjoyment comes from not micro-managing their projects and letting them spread out and make a mess.
And I think having some examples to inspire them would not be a bad thing.
Don't expect them to copy the examples--that can be a creative killer for a little kid.
Instead, show them all the different kind of magic they can make with a cardboard box and some glue.


It's really fun to see everyone's ideas coming together, but it does take time.
I opted for no end time to this party because I didn't want anyone to feel rushed.
It seemed most people needed a minimum of 3 hours to get their diorama done.
The kids got done more quickly.
Spray paint, string and a cardboard box becomes a chicken coop.


Bottle caps and cardboard become wheels and hubcaps.
This one has a fan in it that actually turns on and spins the people hanging from the top of the box.
The only limit to your diorama is your imagination!

Once everyone finished their diorama, we lined them up for pictures, voting and trophy giveaways.
Next up I'll show you how I made the trophies, and the voting ballots.
The fun doesn't stop!
Love from,
Greta

Monday, March 5, 2012

A Sticks and String Mobile

James is working on his art pin for Cub Scouts.
It's a pretty big deal.
He has 6 different art projects to complete.
One of the choices was a mobile.
We decided to make one of sticks and string.


James wanted to use sticks and as we were pondering ways to make the sticks colorful, (you know me and color!) I thought of colored string.
So we went to the craft store and picked out some embroidery thread.
Next we gathered sticks from the back yard.
Those are all the supplies you need to create this mobile.


James chose his own colors.
We did have a little color palette talk as he chose.
First he chose  a bunch of colors he liked and then we narrowed down the choices by separating them into distinct color palettes.
In the end, he decided he liked the brighter colors better than the pastels.


It took a few minutes for James to get the hang of wrapping the string around the stick.
I started it for him by tying the end around the stick.
Then we tested out different techniques for wrapping until we found the one that suited him best.


He liked holding the stick in his left hand and twirling it slowly, while holding the sting taut in his right hand and wrapping it around the stick as it twirled.
For the first few minutes it was a little frustrating.
He was impatient.
But then he found a rhythm.


And after he'd been doing it for a bit, he told me he liked it because it was so quiet and he could just think while he was wrapping the string.
He's right.
It is a very meditative activity.
And after a short while he'd done his first stick.


Before he started wrapping, he had a design in mind.
He chose his sticks and laid them out on the table.
He chose what color or colors would go on each stick.


I wasn't planning that far ahead.
I would have just randomly wrapped my sticks and then decided how they'd fit together.
But James had a vision.


He found it difficult to make the string lie flat over the bumps and knots on the sticks.
And since he didn't like the bumpy look, he opted to leave the knots uncovered.
That is an aesthetic decision left up to the artist.


James worked on wrapping his sticks at 2 different sittings.
When he was done, he laid them out and I helped him tie them together.
He wanted them tied with white string.
It was a big of a trick to get them to balance just right.
That was part of the design process--figuring out the weight of the sticks and how they would balance each other.
He did a pretty good job of it.


And he was proud of how it turned out.
It's a real mobile!


I like the juxtaposition of the brown sticks and bright colored string.
Aaron likes it because it looks "boy scouty".


But mostly I like it because I like working on art projects with my boy.
Ones that are simple and still beautiful.
And you can bet I'll be wrapping some sticks of my own real soon.


Here's a funny thing about this project.
I really thought it was original.
Not that I was the only person who had thought of wrapping string around twigs,  but I really hadn't seen it anywhere else.
It was a new idea to me.
But then, like the next day, I saw this, on a friend's Pinterest board.
There was this one too.
And I had to laugh.
Guess it wasn't such a new idea after all.
But we're still very happy with our mobile.
Next we're tackling collage.
We'll be studying it and creating it in the form of mosaic.
I can't wait!

I have some amazing garage sale finds to show you from this weekend.
I haven't been garage saling in ages, but decided to try one that sounded good.
It was.
Oh my, how good it was.
Check back sooon to see my treasures.
Love from,
Greta

Thursday, February 16, 2012

A Valentine Throw Down (and other goodies from the party)

I know Pinterest is telling you Valentines Day is over.
It's all about St. Patrick's Day now.
Well I'm here to tell you that we're still talking about Valentines day.
And who says you can't pin these ideas for next year?
I say you can!
Pin away, my friends.

I think Valentines day makes for some lovely photographs, don't you?
I had so much fun snapping photos at our Valentines party.
Come to think of it, I was a terrible host.
I didn't check on the food once.
I never made a second pot of coffee.
I forgot to put out napkins.
Thank goodness Davy is such a mellow baby and didn't mind watching the party from the confines of his play pen.
Cause I kinda lost track of him to....
But I did get some great pictures.

Pink and red is one of my favorite color combos.
And all the hearts?  
I love them.


Polka dots, too.
Especially in pink.


Then there were the boxes to hold the Valentines.
Just look at these repurposed cereal boxes.


Stinking darling!


And this is just a gift bag, but jazzed up with a personalized label.
So cute.


Then there were the Valentines.
There were so many cute ones.
The kids loved going through them all.
So did I.
You may have seen some of these floating around on Pinterest.
If so, enjoy them again.
If not, pin them for next year.


Bouncy ball fun.


Lolly pop adorableness! (tutorial here)


Cuting up some candy conversation hearts.


The balloon surprise.
1.
 2.
 3.
 4.  


And there were other cute ones that I missed in the chaos of 25 kids, 8 and under, running about my backyard, high on donuts and Valentines day candy.
But aren't these ones great?
To see more of our party, go ahead and visit my other blog.
There are some photo booth shots too great to be missed.
Love from,
Greta


And even though I don't do St. Paddy's Day, I got sucked into Pinterest and found some fun and crazy stuff.
Here.  Will the spinoffs never cease?
Here.  Really?
Here.  Now this spinoff I do like.
Here.  Don't do it.
Here.  Please,please, please, don't do it.
Please.