Showing posts with label Recipes. Show all posts

Tuesday, February 19, 2013

The Champion. We Got a Juicer!

We juiced for the first time today.
It wasn't a terribly adventurous recipe--carrot orange--but we went simple for our first time.
It was like liquid sunshine.
A perfect drink for this gray morning.
Isn't it pretty?

Our juicer is a vintage Champion.
The Champion.
I love the name, don't you?
It belonged to my parents, who hadn't used it in years and years.
They gave it to us a while ago, but the cord was broken so it sat in the cabinet, unused.
Aaron fixed it this weekend--he's so handy--and this morning I set the beast up on the counter and the kids and I decided it was time to make juice.
The Champion is a lovely shade of 70s green, big, and is solid.
It weighs a ton.
It has all the original parts.
My favorite is the beautiful wooden tamper and the original recipe and instruction booklet.
It was not super easy for me to put all the parts on and get The Champion operational.
Nothing went together easily and it didn't help that reading technical directions of any kind is not my forte.
Give me a poem and I can pull every nuance of meaning out it you could imagine, but directions for putting together a juicer nearly put me over the edge.
Thankfully I have an 8 year old with a very excellent mind for figuring out the way things work, and who is quite skilled at understanding visual diagrams.
Between the two of us we figured it out.
I only yelled, "arrrrgh!  I hate this thing!" one time.
William scolded me, of course, with at look and these words, "Mom, saying you hate something is like saying kill.  Do you want to kill the juicer?  You're not supposed to say that, Mom."
Can you imagine his lecture if he heard me curse?
Finally, we were ready to juice something.
We started with a bunch of organic carrots.
I thought the  kids would be more open to something not green.
At least for their first time.
They all cheered when the first carrot went through and the juice poured out.
It was so exciting!
(I didn't think about the pulp coming out.  What do you do with all that pulp?  Anything?)
 They were also thrilled by the color of the juice.
"It's so orange, Mom!"
Next we headed outside and picked a bunch of oranges from our very own trees.
We used both the navels and the blood oranges.
As per my mom's suggestion, I peeled the oranges.
She remembered being often disappointed by bitter orange juice.
I figured that must have been from the pith or peel, or both, when you juice the whole orange.
It took a little extra time, but it was worth it to avoid bitter juice.
Everyone took a turn pushing down the fruit.
 Taste test time!
 
Even with a distinct carrot flavor, everyone loved our juice.
It got a thumbs up all around.
I have to say it was some of the most delicious juice I have ever had.
Part of it, I'm sure, was the fact that the oranges were right from our own tree.
Also, that it was juiced minutes before we drank it.
But I think, like so many other things, home made just tastes better.
That is why I make so many things from scratch.
It is messier, takes longer, and requires more effort, but it is almost always worth it.
We'll be juicing lots more, for sure.
And so I need recipes.
Do you have any favorites?
I'm looking forward to trying some green juices and getting those into my kids.
I'm looking for recipes that will help us fight off the colds and flus that seem to be everywhere this winter.
I'd love to hear your favorites recipes, or recipe sources if you have any.

After we got The Champion put together, we had so much fun with our new juicer, and especially enjoying the fruit of our labor.
Here's to two of my favorite things, vintage and homemade!
Happy Tuesday!
Love from,
Greta

Friday, November 2, 2012

Making Bread

Hello friends!
I'm popping in to tell you that we're baking bread today.
As usual, I have a list a mile long of things I want to write about.
For one thing, I think I finally found my china pattern!
I've been married for nearly 15 years, and it's taken me this long to find the one that I really love.
It's vintage Franciscan ware and I can't wait to share it with you.

But back to the bread.
There are few tasks I find more satisfying than making my own bread.
There are few smells more enticing than bread baking in my oven.
There are few things more delicious than bread fresh from my oven, eaten warm with butter.
It is worth every ounce of effort.
And truthfully, it isn't much effort at all.
We tried this recipe for the first time, and mixing it up was a dream.
It's in the oven right now, rising.

Since we'll be having a late dinner tonight, our bread will be ready for us, all warm and delicious, in a couple of hours.
Having fresh baked bread with dinner makes for such a special treat, doesn't it?
I'll let you know how the bread turns out so you can make some too.
I hope you will.
Even if you only do it once a year, your family will thank you for it.
Treat them.
They're worth it!

Can I tell you how wonderful it feels to be turning on my oven and making soup and fresh bread for dinner?
It's November and today was perfectly cool--just a touch under 70.
I know, that's a Southern California autumnal day, but I'll take it.
Last night I baked pumpkin muffins, and tomorrow...who knows.
It's November, one of my favorite months, and I'm thankful for so many things.
Today I'm thankful for the smell of yeast, and the warmth of my oven, and for a family that I am blessed to care for.
It is good to take care of people.
Wishing you a wonderful November weekend!
Love from,
Greta

Monday, August 20, 2012

Made From Scratch: Cherry Tomato Pasta Sauce

It's tomato time.
Some lucky people have vines in their gardens absolutely dripping with them.
But if you're not one of the lucky ones, you can still visit the farmers market and buy some.
The stands there are full of the fragrant, red, beauties.
Whether you pick your own, or buy a bucketful, you'll need to do something with them.
The easiest thing to do, of course, is to slice them, drizzle with olive oil and balsamic vinegar, and eat them with thick slices of fresh mozzarella and basil, like this.
You can also make tomato sauce.

If you've ever made tomato sauce from scratch, you know it is a time consuming, hot, messy, and somewhat tedious process.
It's not something you can start an hour before dinner.
It's also not something you want to do when it's 90 degrees in your kitchen.
All that peeling, seeding, and boiling--it's a lot of work.

That's why I want to tell you about my favorite tomato sauce: Cherry Tomato Pasta Sauce.
No peeling, seeding or pots of boiling water required.
It's fast.
And best of all, it's completely delicious.
This sauce is simple to make:
4 ingredients.
5 if you want a bit of spice.
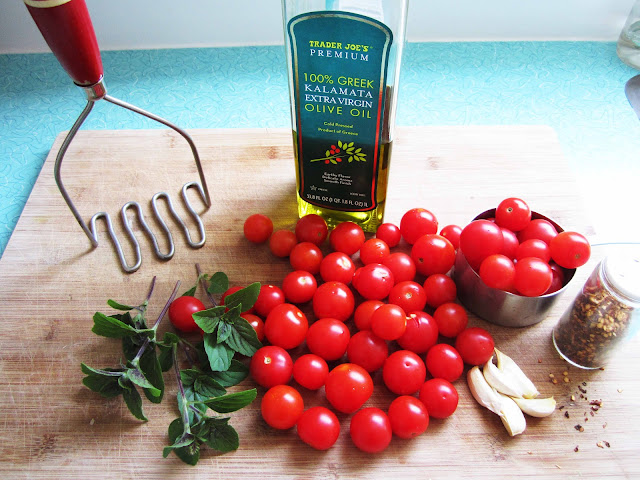
You'll start with a bunch of cherry tomatoes.
These are just the red ones, but I also like to use the yellow ones--they make a really pretty sauce.
The only prep you have to do to these tomatoes is to wash them and remove the stems.
Could it be any easier?
Using a generous amount of olive oil, you'll start by sauteing the garlic.
Don't let it burn, just get lightly brown.
If you like your sauce with a little kick like I do, you can add some red pepper flakes to the hot oil and garlic.
As soon as the garlic is ready, add the tomatoes.
You just dump them right into the pot whole--remember no prep needed.
Let them cook in the hot oil, stirring every couple of minutes with a wooden spoon.
Pretty soon they'll start to get soft and then split.
Once they begin to split, take your potato masher, or a big fork, and begin to crush the tomatoes.
You don't have to fully crush them.
Just smash them enough to release their juices.
Add salt and pepper to taste, and a spoonful of sugar to cut the acid.
Bring to a boil, then turn down to a simmer.
Allow the sauce to simmer until it reaches the consistency that you like.
It can get quite thick if you allow it to cook a while.
The sauce will be full of skins and seeds, but it really doesn't matter.
It tastes so good that you don't notice.
Really.
The cherries are different than the giant beefsteak tomatoes--the seeds are smaller and the skins are softer.
My kids ate this sauce and loved it.
I really don't need to say anything other than that, right?

I've been making this sauce for years.
It is one of my all time favorites.
It's very fresh and light--perfect for a hot summer night.
After it's done cooking, I like to add fresh basil to the sauce.
That adds another layer of freshness and really makes this sauce pop.
It tastes really good over a pasta like orecchiette.
Those little pockets catch the sauce perfectly.
The sauce also freezes very well.
You can freeze it in mason jars, or flat, in freezer bags to save space.
I don't add the fresh basil if I am freezing.

If you think it's not worth the trouble to make up a big batch and freeze, let me convince you otherwise.
Come December or January, when it is cold and overcast and there isn't a good tomato to be found anywhere, you'll take out a bag of Cherry Tomato Pasta Sauce, defrost it, warm it, and pour it over some hot pasta.
The beautiful color will brighten your day.
The fresh tomato flavor will explode in your mouth and you will be instantly transported back to the long days of sunshine.
This tomato sauce tastes like summer.
Make it!
Love from,
Greta

*The batch I made for this recipe was very small.
I just needed to use some ripe tomatoes I had on hand.
2 cups of tomatoes filled 1 quart mason jar.
It was just enough for us all--and none of us drowned our pasta is sauce.
Obviously you can double, triple or quadruple it and make a whole lot more.
It will be totally worth it.

Cherry Tomato Pasta Sauce  
inspired by an old recipe from Martha Stewart Living magazine
2 cups cherry tomatoes (red, or a mix of red and yellow)
Olive oil
Red Pepper flakes to taste
2 large cloves garlic (the original recipe calls for much more, but I like it a bit more mellow--you can adjust it to your own taste)
1 teaspoon sugar (you can add more if you like the sauce a bit sweeter)
Salt to taste
Fresh basil leaves

Cover the bottom of a large, heavy bottomed, pot with olive oil and heat
Roughly chop the garlic and add to the pot
Add red pepper flakes to taste ( a little goes a long way)
Stir the garlic and cook until it is lightly browned
Add the tomatoes
Cook, stirring occasionally, until the tomatoes start to split
Smash the tomatoes with a potato masher or fork until juices are released
Add sugar and salt to taste
Simmer tomatoes until the sauce reaches desired consistency
Remove from heat and add basil
Enjoy!

Monday, August 6, 2012

Raspberry Pancakes with Whole Wheat Flour and Flax Seedss

The past 3 weeks have been an absolute whirlwind.
Back to back vacation Bible schools, one of them at my parent's church, which meant the kids and I spent the week in Fallbrook, everyone but William getting sick with the flu, and then Aaron and I taking a quick trip to Palm Springs, sans kids, to celebrate my birthday.
I've been gone from home for almost 2 weeks, driven back and forth to Fallbrook 4 times, packed and unpacked for 5 people 8 times, and left my baby overnight for the first time.
Whew.  I'm beat.

The more kids I have, and the older they get, the more I have come to realize that my life is going to be pretty busy.
Even if I make an effort not to schedule every day--to allow room for days when we never even get in the car--our other days are busy.
I really like the slow days.
But there are times when I have no control over the schedule, when there are heaps of things going on, and we just roll with it.
Still, it can be tiring.
Those are the times that a little break feels really good.
Even when the break happened because I stayed up most of the night with a crying baby, a 6 year old with a fever and a sore throat, and a barf bowl.
Just in case.

Today was supposed to be another busy day.
But then William walked into the living room at midnight, where I was ironing the kids' clothes for church. (I was trying to do things ahead of time, thus avoiding the Sunday morning-get-in-the-car to-drive- to-church- in-a-bad-mood routine.  Does that only happen at my house?)
"I don't feel good," he said.
He had a fever and a sore throat.
After the flu Lilly and James had 2 weeks ago, I am gun shy.
So I grabbed the barf bowl.
Just in case.
William and I climbed into my bed.
He was obviously feeling rotten, because he cried as he leaned his hot little body against me.
I held him and prayed for him.
Minutes later Davy woke up, screaming.
It was the kind of cry that says, "come and get me now!" 
Aaron went to him and tried to sooth him, but he'd have none of it.
So Aaron and I switched places and I took Davy.
I was up most of the night with him.
I don't know if he has a molar coming in, or something else going on, but many times he was nearly inconsolable.
It was unlike him, and very exhausting.

We must have drifted off on the couch in the wee hours of the morning, because I could hardly open my eyes when he started asking for breakfast at 6.
Six?  
Really David?
I threw some grapes at him and made coffee.
It was when I put the 3rd spoonful of coffee in my cup, instead of into my Bialetti, that I realized I was tired.
Very tired.
But there was good news, even though it had been a grueling night, 1 sick kid, and another potentially sick kid, meant my day just got a lot less busy.
We'd be home today.
I was glad for that.
It meant there was time to make pancakes for breakfast.
I've posted about pancakes before.  Here, here and here.
But I've never given you the recipe I've been using for the past year with great success.
It's from Marion Cunningham's The Breakfast Book.  (A favorite since I checked it out from the library in 4th grade.  For reals.)
This recipe makes a great pancakes.
It's a thinner pancake--the kind that gets crispy around the edges and has lots of those little, airy, holes in it.
Thus far I've made it according to the recipe, using buttermilk and white flour.
Last time I added some blackberries from our vines.
This morning, however, I decided to change things up a bit.
I had no buttermilk, and no lemons or vinegar to make my own, so I used straight milk instead.
I replaced most of the white flour with whole wheat and I added some ground flax seed.
Once I poured the batter on the griddle, I added some frozen raspberries to the cakes.
They turned out great!
I like them even better than the original recipe.
None of the kids liked the raspberries--they were pretty tart.
But I liked the tart berries because I don't like my pancakes to be super sweet.
The whole wheat flour and flax seed didn't bother them a bit, though.
When James took his first bite, he said, "Mommy, these pancakes are so good."
And that's the reason I do this, people.
I love taking care of my family.
Aren't my little Dutch boy and girl sweet?
My mom gave them to me for my birthday.
Thanks, Mom!

You'll find the pancake recipe at the bottom of the page
Give them a try this week if you are lucky enough to have a slow morning.
If not, save them for the weekend.
Happy breakfasting!
Love from,
Greta


Here's the original recipe for the pancakes.
And here's my interpretation from today.

Raspberry Pancakes with Whole Wheat Flour and Flax Seed  (inspired by Marrion Cunningham)
1 cup milk
1 egg
3 tablespoons butter, melted
3/4 cup whole wheat flour
1/4 cup white flour
2 tablespoons ground flax seeds
1 teaspoon baking soda
Fresh or frozen raspberries*

Beat milk and eggs together
Add melted butter slowly, making sure the milk and eggs stay cool
Mix butter, milk and eggs together
Mix dry ingredients together
Add wet ingredients together until just combined
Lumps are OK
Heat griddle and lightly grease with oil or butter
Pour a small amount of batter onto the griddle (I use my 1/4 measuring cup)
Sprinkle a small handful of raspberries over the pancake
When bubbles form around the edges, flip the pancake
Serve with butter and maple syrup
*You can substitute any other fruit here if you don't have raspberries.  Blackberries are very good.
Blueberries, of course.  Also, all the stone fruit that is ripe right now would be really good.
Small pieces of ripe peach, apricots, or even plum.

Tuesday, July 17, 2012

A Paper Doll Birthday Party

Lilly turned 4 at the end of June, and so a sweet, girly, party was in order.
We went with paper dolls.
I got the idea ages ago, but aside from creating a small pin board with ideas, I didn't do a thing until the last minute.
The very last minute.
I read some blogs where the authors talked of prepping party stuff for weeks before the party.
I just can't do that.
Weeks before a party, I am working on some other project, and thinking that I still have tons of time to prep for the party.
And that's why I generally get 2 or 3 hours of sleep before any party I throw.
But it always works out.
This time was no different.
Lilly's paper doll party was a sweet success, and just as cute and girly as I hoped it would be.
I love planning parties for the boys, but let me tell you, these girl parties are pretty fun.

Here's what I came up with for the Paper Doll Birthday Party.
These paper dolls were my inspiration for the party.
I saw them first on this fabulous blog, and then found the whole set here.
You can download and print them for free!
The night before the party I was cutting out lots and lots and lots of these dolls.
They made a very sweet garland.
I just used double sided tape to tape them to some pink sting.  Easy as pie.
I didn't go with any themes for the food--little, doll housy, or any other theme that "goes" with paper dolls.
I try to steer away from that because it usually means more work than I have time for.
Instead I just let the guest of honor choose some favorite things he or she wants to serve at the party.
Lilly went with lots of pink things: pink lemonade, pink cupcakes (these strawberry ones are the best ever and worth every bit of effort it takes to make homemade cupcakes.  which I did.  at 1 AM), strawberries and watermelon, and Pirates Booty.
I hate Pirate's Booty, but she loves it, so her wish trumped my distaste.
I also made some fresh zucchini bread for the grownups.
That's it.
Not a lot, but it was an afternoon party, and the kids didn't really need to eat that much.
I do love the way the table looked with all the pink and the paper doll garlands stung above it.
Target now sells paper straws.
Target, I love and hate you at the same time.
We had to have pink, polka dot, paper straws for the party.
I love a party with a good craft.
We're pretty into art parties around here.
For the paper doll party, I had the girls decorate their own paper dolls.
Aaron drew 2 different paper doll shapes for me and I cut them out on card stock.
I used card stock rather than regular paper so it would have some weight to it and hold up to glue, sequins and the like.
One of the dolls was a ballerina, and the other was just a little girl with pigtails.
I set out colored pencils (these ones with erasers were a big hit), tiny fake flowers, sequins, little jewels, scissors and colored paper to use for making clothes, and cupcake liners to use for frilly skirts.
Every girl made at least one, and most made more.
Even the littlest girls had fun gluing, and drawing faces on their dolls.
The dolls came out so great.
Each one was different and had such personality.
I loved them all.
Here are a few I was able to get shots of.


Don't you just love them all?
Besides making paper dolls, Lilly wanted everyone to get their nails painted.
I had no idea what a hit that would be!
I wish I had pictures, but as I was the one running the nail salon, I don't have a single one.
I highly recommend adding nail painting to a little girl party if you can.
They all loved it.


When the girls grew tired of making paper dolls and their nails were all painted up, I had other spots for them to engage in self directed play.
Now that we have a backyard that has room for all kinds of play, I like to allow time for it at parties.
When there are too many activities scheduled, I get a little frazzled and don't enjoy the party as much.
Maybe the kids don't either.
There was a library spot on top of the playhouse with comfy pillows and a blanket to sit on.
There was lots of chalk for chalkboard drawing.
We sat out all of Lilly's dress up clothes for the girls to wear.
Most of them dressed up and it was so fun to see them climbing the tree, riding the swing, or sliding down the slide in their poofy dresses.
You can see in this picture how sweet they all looked in their tulle.
Lilly's only cake request was pink cupcakes with pink frosting.
I made the same fresh strawberry cupcakes  made last year.
They are so amazingly delicious.
For the frosting this time I did puree the strawberries, but I added too much puree to the frosting and so it got a little (lot) runny. 
It still tasted delicious though.
I used a regular butter cream frosting recipe (this one is really good) and added 1 cup of fresh strawberry puree.
Next time I'll use half a cup.
The party ended with Lilly and her cousin Lizzy blowing out the candle together.
Their birthdays are a week apart and since they are often mistaken for twins, it was perfect for them to share the birthday candle.
I sent the girls home with a simple gift bag decorated with a paper doll.
I bought a package of plain white gift bags from Michael's, and attached a paper doll to it with spray adhesive.
Spray adhesive is my new best friend.

Inside I put 2 more paper dolls and some outfits for her to wear, a "bracelet cuff" of candy buttons and some Mary Jane candies.
Those seemed like appropriate candies for a paper doll party--and you just have to have a little bit of candy at a birthday party, right?


Even though this party was thrown together at the last minute, it still turned out to be sweet and fun, and just as I had hoped it would be for my little girl.
Check back soon for a mini tutorial on how I made the printed out paper dolls for the goodie bags.
And if you're in the mood for more fresh strawberry baked goods, check out my last post on fresh strawberry scones.
Love from,
Greta